No Time.

Well, the time has come, and I always knew it would, for me to realize I don't have the time to remember to blog regularly anymore. I recently started school and have been mixing albums for other bands, working full time, and trying to release an album with my internet band. That plus the fact that I take public transport everywhere, and add in Buster and my lovely wife, AND my friends, and it means... I just don't have the time to do this regularly!

I do want to say that I would hope that anyone out there getting into brewing would try to become closer and closer to their finished product as they become a better brewer. Don't brew with extract. Use public hop varieties. Malt and/or toast some of your own barley if you have the space, and build some cool brewing stuff.

And it isn't just about saving money (ALTHOUGH YOU WILL SAVE TONS), its about coming home after a hard day, pouring a brew, sitting on the porch and thinking...

Fuck yes. I made this, and that is awesome.

Brew on, my brethren. Im sure I will post on here a few times a year, and Im sure no one really read it... but I hope I helped someone in their beer brewing journey, and I hope to meet that person when we get to that big imperial pint glass in the sky!

ANOTHER DOUBLE BREW DAY


Hot damn, have I ever been busy lately. Got a new job and my mom and her cool boyfriend Ed were in town for a few days for the holiday. Which is all fine and dandy, but these things tend to get in the way of the things that really matter... beer. Yesterday I had the whole day off and a bunch of recently finished malt, so I got up at the crack o' ten and got busy brewing! TWO BATCHES! Last week I came to the decision that I want to pick two beers that I always keep on tap, and one rotating tap. Who were the lucky winners for a permanent spot in the keezer?

Recently I made a porter. Good news: ITS FRIGGIN AWESOME.
I decided that this beer will be one of my first launch beers when I get around to starting up a brewery. At 6 percent, it also makes a fantastic winter warmer, so I decided it has earned itself a life long spot in the kegorator.

I also brewed up a pale a couple weeks ago to start the search for a house pale. I have not yet kegged it, but I did sneak a sample last week and it blew me away, so I decided that it would be the lucky winner of the second permanent spot.

Of course, I will be tweaking these recipes, but when you are malting all of your own ingredients it really helps to be able to plan ahead as far as possible. The grain bills for these beers are extremely simple, so now I know I won't have bags of random specialties that I decided to make on a whim with no particular beer in mind. The best part is neither of them use any crystal malt, which is a pain in eh @$$ to make.

Back to the brew day. All went well, except for a stuck mash at the end of my second brew. I did the pale first, and the porter second. It was FREEZING outside, so I brewed in the house, and discovered that...

HEAT STICK+RANGE=OMG HELLA HEAT BOIL BOIL BOIL
Sparge water and wort got up to temp SO fast. It was amazing.

Im typing this at work, and right now they are both in the tub cooling to pitching temps. Can't wait to get home and toss some yeast in those bad boys. Beer rules.

LOST ALL MY MALTING PICTUREEEEEEEEEEEEESSSSSSSS

F F F. My phone decided to stop working yesterday, and so I lost all of the pictures of the latter half of the malting process. I was going to do a step by step on how to malt... anyways, Im going to Best Buy to see if they can help me out. Hopefully they can get my pictures back, if not I might be SOL.

BALLS!

BEAUTIFUL DAY TO BREW

Denver is awesome. The weather is great, and today it is particularly nice outside. I just mashed in on my first attempt at a repeat/improvement on a home malt brew, and now I'm just hanging outside with the Busterman smoking a pipe and rocking a homebrew.

This is the best hobby in the world. I can imagine brewers hundreds of years ago doing the exact same thing as I am right now, and for some reason, its profoundly comforting.

That's all all I have to say about that.


SCIENCE EXPERIMENT

For a while now, I have been malting and toasting my own grains for all my beers. I think the official count is the last eight batches have been made from only home malt. Suck on that, overpriced homebrew shop! The only problem is the fact that I tend to jump into things full-force, like an action star jumping out of the third story window of a burning building while rescuing a baby. Sure, in the end it turns out great, but I don't take the time to think things through and take notes, so when I go to repeat the process, I could end up with a totally different beer. Or using the same analogy, I could end up with a broken leg and a dead baby.

OK, maybe not that bad, but with all of my home malted beers I have been putting in two to four specialty malts, roasted for different lengths of time. This becomes a problem because in the end I don't really know which malt is having the greatest effect on the color and taste of my finished beers. And now that the burning obsession with home malting has died down, its time to get serious and start learning the effects of toasting and roasting on my beers.

So with all that in mind, over the last couple of weeks I made two wheat beers: a dunkleweizen and a hefeweizen. The hefeweizen recipe looked like this:

2.4 lb pale malt
2.4 lb wheat malt
Mt Hood/Goldings to 15 IBU

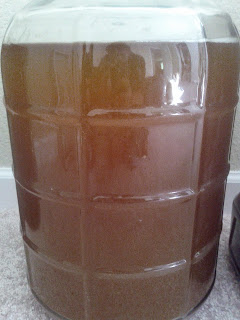
Easy enough. Mashed in the mid 50's. I racked this one over to "secondary", which basically means I want to free up my buckets and look at my pretty beer in a see through container, and it looks like this:

The dunkleweizen was essentially the same recipe, BUT (and I know I already talked about this in my last post) I roasted half of the wheat malt in the oven @ 400 degrees for 30 minutes. Differnent hop schedule too, but this experiment was more about color, so that doesn't matter. I JUST racked that one over to the OMGlookatmyprettybeerbottle a few minutes ago and it looks like THIS!
Big difference! Also, the sample tasted great. Roasted wheat is something I have never been able to use since it doesn't really exist at a homebrew shop, and it is VERY interesting.

Both beers taste awesome and I am pumped to keg them. Actually, now I think it will be easier for me to continue to let my pumpkin beer age until Thanksgiving, since I know I have these two great beers on deck!

Alright, I gotta go work on getting a keg empty so I can get one of these going... PEACE!

WINTER BREWING=BEST BREWING

The snow is falling, Buster hates going outside, I have to go find my jacket, and my beers always stay in the perfect fermentation temp... yep, its wintertime again! I never thought I would be the guy to say it, but damn it, I love the winter. Since I have not done a brewing update in a while, I figured now would be a good time to just post my brewing adventures of the last couple of weeks.

The first thing I did when I got home from tour was malt a batch of wheat. It took FOREVER, I assume because of the colder temperatures. The first thing I brewed with that batch of wheat was my hefeweizen recipe. Same recipe that I always make, but this time with HOME MALT! I just pulled a sample of this batch the other day and it tastes great, only a week in.

The second thing I brewed was a dunkelweizen, kinda. What I did was I toasted 1.5 pounds of my wheat malt in the oven @400 degrees for a half hour, and I also used S04 instead of 06, hence the "kinda." Heres a picture of me preparing for my brew day ritual. Isn't that grist pretty?
Today I started a new batch of barley malt
AND tasted my pumpkin ale, which is tasting pretty damn awesome right about now. I'm trying hold out until my mom visits to keg it, but I don't know if I will make it that long!

Other than that, I've just been enjoying the weather and enjoying my beers currently on tap. Right now, its my copper ale (which is the tits), my Chinook IPA (tasting pretty good as well) and apfelwein, which I can't get enough of. Life is great.

With this current batch of barley I will be making a "how to" on how to malt grain. So stay tuned for that, keep warm, and DRINK HOMEBREW!

APFELWEIN AND THE PERFECT FALL BEVERAGE.

While browsing the Homebrewtalk.com forums, I came across a recipe for a hard cider that it seemed everyone (mostly) raved about. Its called apfelwein, and the particular recipe I made was created by a guy on the forum named EdWort. So, after reading all the great reviews on it, four week ago I whipped up a batch. Its really easy, here is the recipe from the site:


Ingredients

5 Gallons 100% Apple Juice (No preservatives or additives) I use Tree Top Apple Juice
2 pounds of dextrose (corn sugar) in one pound bags
1 five gram packet of Montrachet Wine Yeast

Equipment

5 Gallon Carboy (I use a Better Bottle)
Carboy Cap or Stopper with Airlock
Funnel

  1. First sanitize the carboy, airlock, funnel, stopper or carboy cap.
  2. Open one gallon bottle of apple juice and pour half of it into the carboy using the funnel.
  3. Open one bag of Dextrose and carefully add it to the now half full bottle of apple juice. Shake well.
  4. Repeat Steps 2 and 3, then go to step 5.
  5. Pour in the mixture of Apple Juice and Dextrose from both bottles into the carboy.
  6. Add all but 1 quart of remaining 3 gallons of apple juice to the carboy.
  7. Open the packet of Montrachet Yeast and pour it into the neck of the funnel.
  8. Use the remaining quart of juice to wash down any yeast that sticks. I am able to fit all but 3 ounces of apple juice into a 5 gallon Better Bottle. You may need to be patient to let the foam die down from all shaking and pouring.
  9. Put your stopper or carboy cap on with an airlock and fill the airlock with cheap vodka. No bacteria will live in vodka and if you get suckback, you just boosted the abv.
There’s no need to worry about filling up a carboy so full when you use Montrachet wine yeast. There is no Kreuzen, just a thin layer of bubbles (see here). I'm able to fit all but 4 oz. of my five gallons in the bottle. Ferment at room temperature.

It will become cloudy in a couple of days and remain so for a few weeks. In the 4th week, the yeast will begin to drop out and it will become clear. After at least 4 weeks, you can keg or bottle, but it is ok to leave it in the carboy for another month or so. Racking to a secondary is not necessary. It ferments out very dry (less than 0.999, see here)

Apfelwein really improves with age, so if you can please let it sit in a carboy for up to 3 months before bottling or kegging, then let it sit even longer. 


I followed this exactly, and last night, I kegged it. I have to say, it is

AWWWEEESSSOOOMMME!!!!!

I have made ciders in the past, some good, some not. None of them were nearly as good as this particular recipe. Dry, yet sweet, and still has a nice apple flavor hanging around. Also, its very strong... like Hercules strong. Here's a  picture, only the second pour out of the keg so its still clearing a bit:

And as fantastic as this stuff is by itself, it also makes an amazing winter/fall warmer. Here's what I did:

1. Pour off about a cup of apfelwein.

2. Put it in a saucepan with a 1/2 TBS raw sugar and about a half of a small cinnamon stick.
Let that simmer for a little on LOW heat. If you make it too hot, you might accidentally boil off some of the alcohol. (NOOOOOOOOOOOOOOOOOOOOOOOO!!!!!).

3. POUR IT IN A MUG AND DRINK IT!
Its great on a nice cold evening... or morning... and it will jam some fall spirit right down your throat.

I highly reccomend making some of this! Its totally easy, especially if you don't have any actual brewing equipment. I used a Homer bucket from home depot to ferment it. Anyone can make it, although without a keg you would have to bottle and carbonate that way.

Happy Halloween!

powered by Blogger | WordPress by Newwpthemes | Converted by BloggerTheme